Getting started with the Service Worker Toolbox

I've been playing around with Service Workers a lot lately. I am super excited about the great features that they bring to the web. Offline pages, push notifications and flexible caching are just a few of the great features that they bring to the table. Using these built-in features allows us to build faster, more resilient websites, not to mention the fact that it can be good fun messing around with Service Workers!
It's also important to think about mobile devices. Mobile usage is growing year on year and it's important that we build resilient, performant websites for mobile devices. Service Workers are the perfect progressive enhancement. If your browser doesn't support them, they simply won't work. They give us the ability to build even better websites for mobile users. If you aren't familiar with Service Workers, check out this document for an introduction.
Getting up and running with Service Workers is pretty straightforward, however there are a few lines of code that you might find yourself repeatedly writing when building with them. This is where the Service Worker Toolbox comes in.

Developed by the team at Google, it provides you with some simple helpers to get you started creating your own Service Workers. In this article, I am going to show you how to get up and running with the Service Worker Toolbox by creating a custom Service Worker that uses some of the intelligent caching features that come built into the library.
Getting started
Imagine the following HTML page.
The code above is simply loading a few SVG images as well as the Angular library. Using this web page as an example, I am going to show you how to cache these resources and improve the performance of your web page at the same time.
To start using the Service Worker Toolbox, you can either download it using Bower or directly from Github. Next, you need to add a reference to this file in your HTML page. Instead of the traditional method of adding the script to your page, the Service Worker Toolbox has a helper that will register and install your Service Worker if your browser supports it. Add the following code to your HTML page.
<script src="/bower_components/sw-toolbox/companion.js" data-service-worker="/sw.js"></script>
In the code above, I am referencing the Service Worker Toolbox companion file, and I am also referencing my custom Service Worker file called sw.js. Under the hood, the companion.js file will check if your browser supports Service Workers and if it does, it will register your custom Service Worker.
Next, we need to create a custom JavaScript file called sw.js that will contain the code for our Service Worker. Add the following code to the file.
The code above contains some basic boilerplate code. Firstly, we start off by importing the Service Worker Toolbox library. Next, we need to install and activate the Service Worker. The code on lines 8 & 9 show this in action and ensures that our Service Worker takes control of the page as soon as possible.
Now it's time to add some magic! Given that we are loading the Angular library from the Google CDN, it would be great if we could cache it and only make a request for it when our cache expires. This way the page will load quicker because we have one less HTTP request to make. The Service Worker Toolbox comes with a built-in routing system which is based on the same routing as Express. In its most basic form, routing is the process of matching an incoming request with the most appropriate route. Once we have matched a request, we can then decide what we want to do with it. The code below gives an example of this in action.
      // The route for any requests from the googleapis origin
      toolbox.router.get('/(.*)', global.toolbox.cacheFirst, {
        origin: /\.googleapis\.com$/
      });
Using this code allows us to intercept any HTTP requests that match the origin "googleapis.com". If they match this route, I am then adding them to the Service Worker cache. The code above won't cache anything that doesn't match our route and this kind of flexibility is great because it really gives you the control over what you would like cache.
You could extend the example above and configure the cache further.
      // The route for any requests from the googleapis origin
      toolbox.router.get('/(.*)', global.toolbox.cacheFirst, {
        cache: {
          name: 'googleapis',
          maxEntries: 10,
          maxAgeSeconds: 86400
        },
        origin: /\.googleapis\.com$/
      });
In the example above, I've chosen to cache the results for one day (86,400 seconds). I’ve also chosen to give the cache a specific name and limit the number of entries to 10.
If you look closely at the code above, you may also notice that there is an option with the value global.toolbox.cacheFirst. This is where the Service Worker Toolbox really becomes useful. It has some great built-in handlers to help you with caching. If you take a look at Jake Archibald's Offline Cookbook, you'll see the many different caching techniques available. In this example, I chose to go with a cache first approach which means that if the request matches a cache entry it should respond with that, but if the request doesn't match the entry, it will try to fetch the resource from the network instead and then update the cache. This option is great for resources that don't often change or are served from a 3rd party server. Specifically, it's great for URLs that include versioning information (like the angular library /1.3.15), since those are the ones that really, really won't change. The helpers in the Service Worker Toolbox wrap up all of the heavy work under the hood and handle renaming and cleaning up caches all for you - very handy stuff!
The toolbox also has built-in functionality that allows you to provide a list of resources to be cached at Service Worker install time. For example, if we wanted to precache the SVGs and JS file in our HTML, we could do so with the following code in the Service Worker.
toolbox.precache([ '/images/info.svg', '/images/cv.svg', '/images/contact.svg', 'https://ajax.googleapis.com/ajax/libs/angularjs/1.3.15/angular.min.js']);
Using precache is great, but it is slightly different to setting up a specific route. Precache will fetch the files and cache them, but it won’t actually set up a route to serve them. You either need to explicitly set up a route for those URLs, or set up toolbox.router.default as shown here.
Debugging
If you'd like to see extra console information associated to your Service Worker, it's worth enabling debug mode.
global.toolbox.options.debug = true;
With this option enabled, you'll be able to see debug logging in the Developer Tools console which can be very useful if you want to quickly see if your Service Worker is working as expected.
You can actually take this a step further and use the Developer Tools in Chrome to discover which items are cached and their expiry dates. If you fire up your Developer Tools and head over to the Resources tab in Chrome, you will be presented with something similar to the following image.
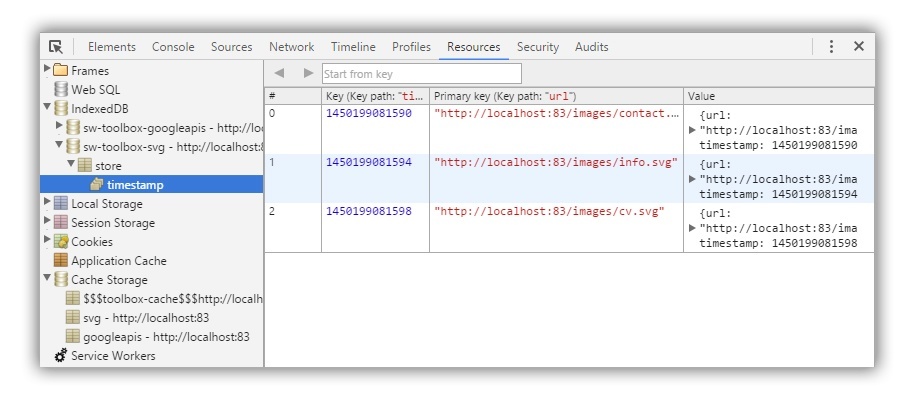
You can see the Cache Storage for the items as well as the IndexedDB results. Very cool stuff indeed!
Conclusion
Getting started with Service Workers has never been easier and thanks to the Service Worker Toolbox, you can pass these powerful features on to your users today. If you are looking for an efficient, tested way of getting started with Service Workers, I thoroughly recommend checking out this library.
If you'd like to experiment or test any of the code used in this article, I've put all this together in a Github repo. A live demo of this article is available at deanhume.github.io/Service-Worker-Toolbox. I also thoroughly recommend checking out this video by Jeff Posnick about the Service Worker Toolbox.